breseq parser gdtools
Last updated:
Note: This is a tutorial was made for the purposes of converting breseq outputs into CSV format on the Cooper Lab’s beagle server. This is also still a working draft so please reach out if you get stuck or if anything is unclear.
If you have not run breseq yet, please refer to the breseq tutorial first to generate the output data necessary for this tutorial.
Getting started
Setting up
For this tutorial, you will need to have the breseq_parser_gdtools.py script available in your home directory on beagle.
Use the scp function to upload the script from your local directory to beagle. Information on how to use the scp function is found in the Basics in Command Line tutorial.
You will also want all your breseq output folders in one main folder (for example, in a folder named “breseq_main”) like so:
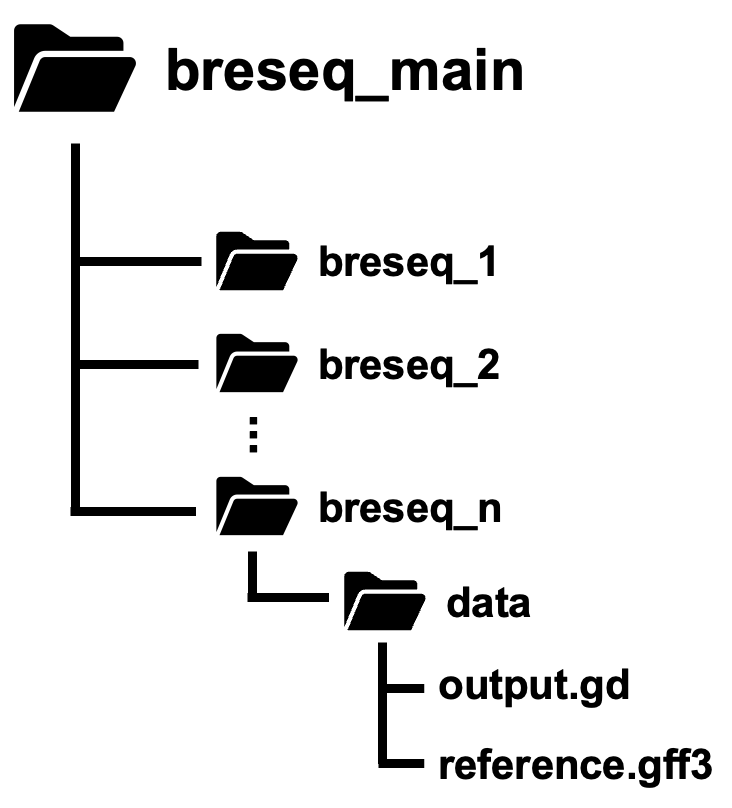
Make sure that every breseq output folder has a subdirectory called “data” and that the “data” folder contains the files, “output.gd” and “reference.gff3”.
The breseq_parser_gdtools.py uses gdtools to first convert the GenomeDiff (.gd) output file into TSV before concatenating all TSV files into one big CSV file.
- To learn more about GenomeDiff formats, the breseq documentation has a comprehensive explanation here.
- To learn more about gdtools, you can visit:
2- vs 3-letter types
Before we run the breseq parser, we must understand the different types of calls that breseq can make. The most important is the 2- and 3-letter codes.
2-letter codes denote the evidence types of the variant calls:
- RA = Read alignment evidence
- MC = Missing coverage evidence
- JC = New junction evidence
- UN = Unknown base evidence
3-letter codes denote the mutation types of the variant calls:
- SNP = single nucleotide polymorphism
- SUB = substitution
- DEL = deletion
- INS = insertion
- MOB = mobile element
- AMP = amplification
- CON = gene conversion
- INV = inversion
There are also 4-letter codes that denote the validation types, but we will not mention these in this tutorial:
- TSEQ = Targeted re-sequencing
- PFLP = PCR-fragment length polymorphism
- RFLP = Restriction fragment length polymorphism
- PFGE = Pulsed-field gel electrophoresis
- PHYL = Phylogenetic comparison
- CURA = True-positive curated by an expert
More information on the different types are found in the official breseq documentation here.
The breseq parser uses gdtools, specifically the ANNOTATE function (and optionally the SUBTRACT). By default, gdtools will remove the 2-letter codes when using the ANNOTATE option but the breseq parser keeps all variant calls including marginal calls. As a result, you may need to filter out variant calls further after using the breseq parser.
We will go over the different options offered in the breseq parser and how to filter out variant calls in the follow sections.
Run the breseq parser
The breseq parser has a few required arguments and a few optional ones. The default option will convert all variant calls in your output.gd files from your breseq run and create one CSV file that includes all variant calls from the breseq output directories included in your main directory.
The optional argument is to remove variant calls of your ancestor sample from the other samples. Note that subtracting the ancestor variant calls only affect 3-letter types and not the 2-letter types.
Regardless, I recommend running the breseq parser in a bash script rather than running it directly in your console as it may take a while to run, especially if it needs to parse multiple breseq runs.
There is an example bash script that you can view here.
I will go over each line so that you understand what the script does.
In your bash script, make sure to load miniconda and breseq:
module load breseq/breseq-0.38.1
module load miniconda/miniconda-3
Please make sure to load breseq v0.38.1 and miniconda-3 or else beagle will use the default breseq which may lead to errors!
Miniconda 3 is required to run the breseq parser as it is a python script. You will also need breseq to use the latest gdtools function. If you are using a different version of breseq, your mileage for this tutorial may vary.
There are two required and two optional arguments for the breseq parser:
- -d (directory) = directory that contains all breseq runs (required)
- -o (output) = output file destination (required)
- -f (filename) = output filename (optional; defaults to ‘breseq_output’)
- -a (ancestor) = directory of ancestor output.gd file (optional)
I recommend writing the full path rather than a relative path to ensure the computer can find the proper folder.
Output all variant calls
If you want all of the variant calls and are not interested in subtracting the ancestor variant calls from the other samples, you can run the parser as so:
#parses without removing variant calls in ancestor
python /home/nak177/scripts/breseq_parser_gdtools.py -d /home/nak177/wgs/mpao1/breseq/ -o /home/nak177/wgs/mpao1/breseq/ -f breseq_parse
Make sure to change the file path to suit your needs as the above example is for running breseq on my outputs in my home directory on beagle.
-d points to the directory of your main breseq folder that contains all your breseq output folder as subdirectories.
-o points to the directory where I would like the output CSV file to be saved to. In my case, I wanted my CSV file to be saved in the same directory where my breseq outputs were stored.
-f is the file name. If none is provided, the parser will default to naming your CSV file as “breseq_output.csv”. In my case, my CSV file will be saved as breseq_parse.csv.
Remove ancestor variant calls
If you would like your variant calls in your ancestor sample to be removed from the other strains, you can add the optional argument -a or –ancestor.
The following is the line of code I ran to remove my ancestor variant call (i.e. my breseq_1 output from the rest of the breseq outputs)
#removes and parses variant calls in ancestor from other samples
python /home/nak177/scripts/breseq_parser_gdtools.py -d /home/nak177/wgs/mpao1/breseq/ -o /home/nak177/wgs/mpao1/breseq/ -f breseq_parse_subtract -a /home/nak177/wgs/mpao1/breseq/breseq_1/data/output.gd
The -d and -o argument is the same as the previous section. However, this time I named my csv file as “breseq_parse_subtract.csv” and pointed to my ancestor strain’s output.gd file in the -a argument. Make sure to point to the output.gd file found within the /data/ folder of your ancestor strain’s breseq output directory.
Filter marginal calls in R
Now that you have your breseq outputs in one CSV file, we can filter out the marginal calls in R. Download the csv file into your local directory and open the csv file in R as a dataframe.
b <- read.csv("/Users/kubotan/Documents/PMI/Cooper Lab/Prophage/sequences/data/MPAO1/breseq_parse.csv", na.strings=c("", "NA"))
You will need to load the following package:
library(dplyr)
We are going to clean the dataframe a bit as some of the columns may just be populated with NAs and there might be a lot of marginal calls that we don’t want to include in our analysis:
not_all_na <- function(x) any(!is.na(x)) #function to remove columns with just NAs in every row
b_all_filter <- b %>%
  filter(type != "UN") %>% #filters out UN (unknown base evidence)
  filter(is.na(consensus_reject) & is.na(reject) & is.na(ignore)) %>% #filters out marginal calls; you may need to remove the is.na(consensus_reject) if you don't have this column in your dataframe
  select(where(not_all_na)) #removes columns with just NAs
If you want to keep the marginal calls and/or the columns with just the NAs, you can modify the above code by removing whichever lines suit your needs.
Then you can save this cleaner dataframe as another csv file:
write.csv(b_all_filter, "/Users/kubotan/Documents/PMI/Cooper Lab/Prophage/sequences/data/MPAO1/breseq_parse_Rfilter.csv", row.names = F)
Translating locus tags with Roary
Sometimes the locus tags in breseq may not be what you want, either because you prefer the older locus tags or because you would like to use locus tags from a different strain.
breseq will use the locus tags that came with the reference genome used to run breseq, but if you would like to use a different set of locus tags, follow the Roary tutorial to run Roary before running the following. In my case, I would like to translate the MPAO1 locus tags into PAO1 locus tags since I am more familiar with the latter.
MPAO1 and PAO1 are very similar to each other so getting Roary to match the different locus tags is not too much of an issue. However, if you have two very divergent strains that may have genes present in one strain but not in the other, you may run into issues with Roary and the following section.
Once you have your Roary output, load the “gene_presence_absence.csv” output into R:
r <- read.csv("/Users/kubotan/Documents/PMI/Cooper Lab/Prophage/sequences/data/MPAO1/roary/gene_presence_absence.csv", na.strings=c("", "NA"))
We will create an identical dataframe from our previous dataframe:
bsub_all_f_t <- b_all_filter
The new junction calls (JC) have their gene name and product in different columns than the other types of variant calls. The JCs have the gene names within the columns named, “side_1_gene_name” and “side_2_gene_name”. The gene products are within, “side_1_gene_product” and “side_2_gene_product”. We will need to combine the values from side_1 and side_2 and populate the “gene_name” and “gene_product” column. We will do this by running a loop to combine side_1 and side_2 using the paste0() function, then move the new junction call gene names and product into the same column as the SNPs:
for (x in 1:nrow(bsub_all_f_t)) {
  if (bsub_all_f_t$type[x] == "JC"){
    bsub_all_f_t$gene_name[x] <- paste0(bsub_all_f_t$side_1_gene_name[x], "/", bsub_all_f_t$side_2_gene_name[x])
    bsub_all_f_t$gene_product[x] <- paste0(bsub_all_f_t$side_1_gene_product[x], "/", bsub_all_f_t$side_2_gene_product[x])
  }
}
After moving the JC variant call gene name and product into the same column as the rest of the variant calls, we will clean the cells by removing some of the symbols:
gene_name <- bsub_all_f_t$gene_name
gene_name <- gsub("\\[|\\]", "", gene_name) #remove brackets
gene_name <- gsub("–", "/", gene_name) #replace dash with slash
gene_name_split <- strsplit(gene_name, '/') #split string by slash

gene_product <- bsub_all_f_t$gene_product
gene_product <- gsub("\\[|\\]", "", gene_product) #remove brackets
gene_product_split <- strsplit(gene_product, ',') #split string by comma
Now we will make new columns that will contain the PAO1 locus tags that match the MPAO1 locus tags (pao1), the gene name of the locus tag (roary), and the gene product (roary_gene_product):
bsub_all_f_t$pao1 <- NA
bsub_all_f_t$roary <- NA
bsub_all_f_t$roary_gene_product <- NA
The column names that I have provided above can be changed to fit your needs, but make sure to change the variable name in the loop below before running it. Otherwise, R won’t be able to recognize which column you’re referring to.
Now run the following loop which will compare the MPAO1 locus tags in your breseq output, find the matching PAO1 locus tag and gene name from the Roary output file, and populate the above columns with the relevant information:
for (i in 1:length(gene_name_split)) {
  temp <- c() #temp dataframe for pao1 locus tags
  temp2 <- c() #temp dataframe for roary gene names
  for (j in 1:length(gene_name_split[[i]])){
    mpao1_gene <- which(r$Gene == gene_name_split[[i]][j]) #which roary gene matches
    mpao1_locus <- which(r$mpao1 == gene_name_split[[i]][j]) #which mpao1 locus tag matches
    if (length(mpao1_gene) == 1) { #if there's a roary gene match
      temp <- c(temp, r$pao1[mpao1_gene]) #save pao1 locus tag
      temp2 <- c(temp2, r$Gene[mpao1_gene]) #save roary gene name
    } else if (length(mpao1_locus) == 1){ #if there's a locus tag match
      temp <- c(temp, r$pao1[mpao1_locus]) #save pao1 locus tag
      temp2 <- c(temp2, r$Gene[mpao1_locus]) #save roary gene name
    } else { #otherwise, populate with original value
      temp <- c(temp, gene_name_split[[i]][j])
      temp2 <- c(temp2, gene_name_split[[i]][j])
    }
  }
  temp3 <- c() #translate gene product column
  for (k in 1:length(gene_product_split[[i]])) {
    product <- gene_product_split[[i]][k]
    if (substr(product, 1, 5) == "MPAO1"){ #if value starts with "MPAO1"
      mpao1_locus <- which(r$mpao1 == product) #which row in roary mpao1 locus tag matches product
      if (length(mpao1_locus)==1) { #if roary gene match found
        temp3 <- c(temp3, r$Gene[mpao1_locus])
      } else {
        temp3 <- c(temp3, product)
      }
    }else{ #otherwise, populate with original value
      temp3 <- c(temp3, gene_product_split[[i]][k])
      }
  }
  bsub_all_f_t$pao1[i] <- paste(temp, collapse = ", ")
  bsub_all_f_t$roary[i] <- paste(temp2, collapse = ", ")
  bsub_all_f_t$roary_gene_product[i] <- paste(temp3, collapse = ", ")
}
Note: if there is no match found in the Roary file, then it will populate the column with the MPAO1 locus tag.
Then lets save the dataframe into a new csv file:
write.csv(bsub_all_f_t, "/Users/kubotan/Documents/PMI/Cooper Lab/Prophage/sequences/data/MPAO1/breseq_roary_edit.csv", row.names = F)
If you only want to save a subset of the columns, you can create a new dataframe with only the columns that you want and save that as a csv file. In my case, I only want the columns “breseq”, “position”, “gene_position”, “size”, “type”, “gene_name”, “locus_tag”, “pao1”, “roary”, “gene_product”, “roary_gene_product”, “new_junction_read_count”, “side_1_strand”, “side_2_strand”, “new_read_count” ,”new_cov”:
bsub_all_f_t_sub <- bsub_all_f_t[c("breseq", "position", "gene_position", "size", "type", "gene_name", "locus_tag", "pao1", "roary", "gene_product",  "roary_gene_product", "new_junction_read_count", "side_1_strand", "side_2_strand", "new_read_count" ,"new_cov")]

write.csv(bsub_all_f_t_sub, "/Users/kubotan/Documents/PMI/Cooper Lab/Prophage/sequences/data/MPAO1/breseq_roary_edit_sub.csv", row.names = F)