Running breseq on beagle
Last updated:
Note: This is a tutorial was made for the purposes of running breseq on the Cooper Lab’s beagle server. This is also still a working draft so please reach out if you get stuck or if anything is unclear.
Getting started
In order to access the Cooper Lab servers, you must have permission to access them. To do so, make sure to email JV to receive permission prior to getting started.
UPDATE (09/14/2022): We no longer use Pulse Secure. Please switch to GlobalProtect.
You will also need Pulse Secure GlobalProtect installed into your computer. You can receive a free copy of it through Pitt by going to software.pitt.edu. You may need your Pitt ID to log in and download the software. Make sure to also select the appropriate version for your computer.
If you are having trouble, make sure to check here as Pitt has information on how to connect through GlobalProtect as well as a step-by-step guide for different devices.
Connect to beagle
We will be working with the server, beagle, to run our breseq analysis.
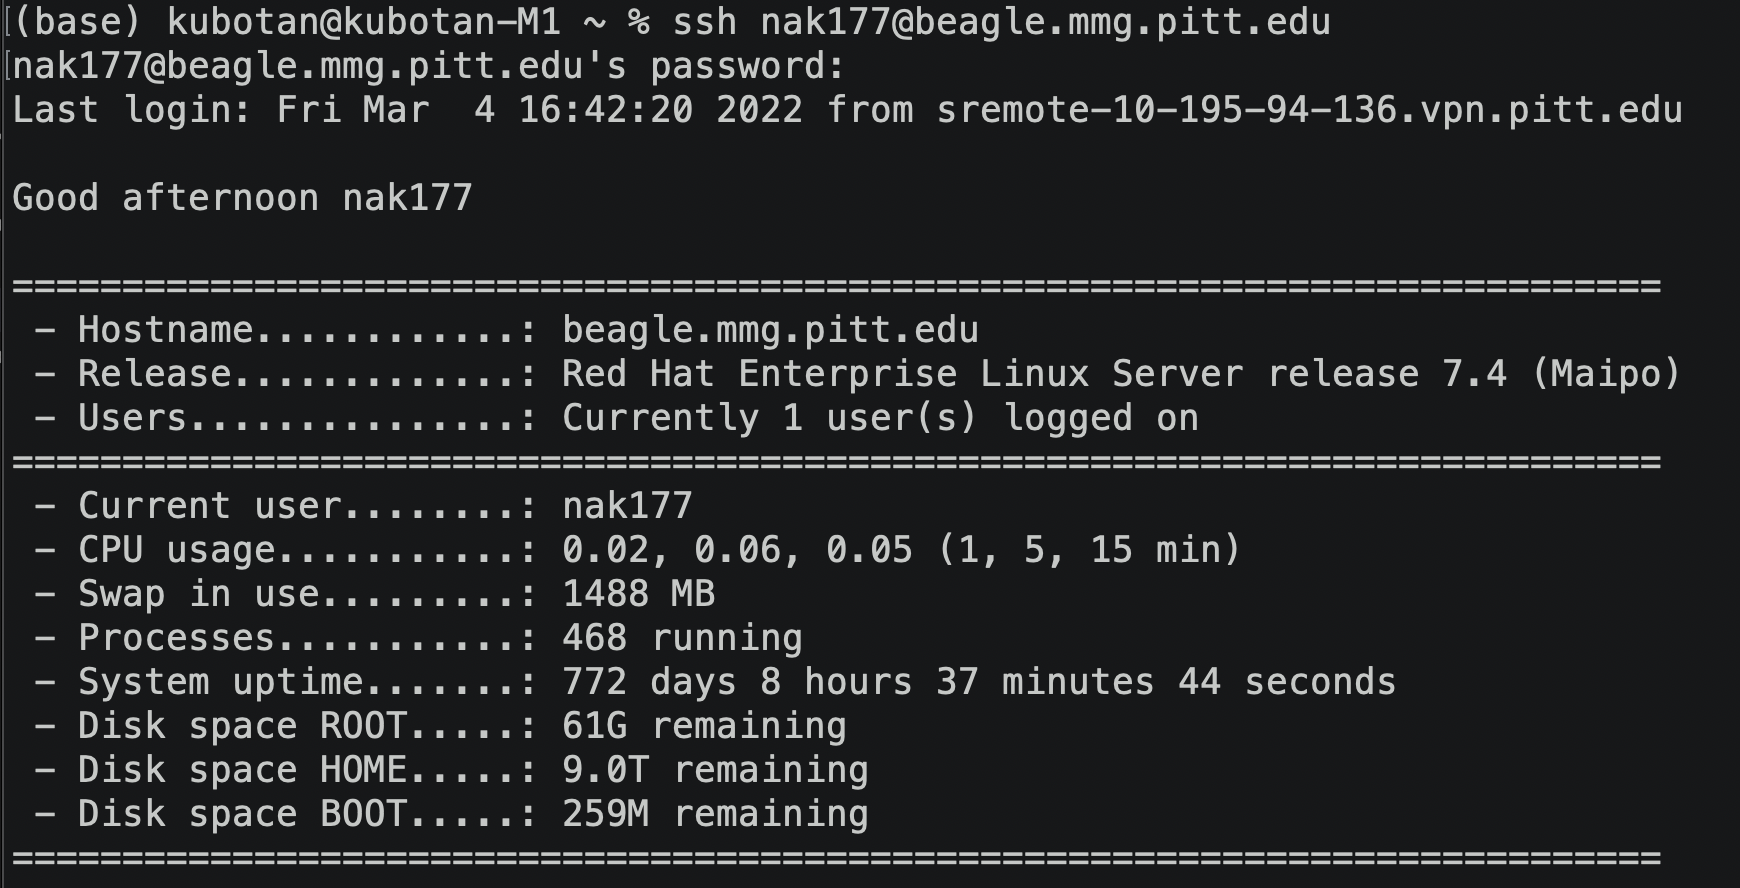
To connect to the server, use ssh followed by your own Pitt username @beagle.mmg.pitt.edu. In my case, since my Pitt ID is nak177, my line of code will be:
ssh nak177@beagle.mmg.pitt.edu
The format should be *ssh yourPittID@beagle.mmg.pitt.edu* . After you hit enter, you will be asked for your password. Type in your password and hit enter.
Your screen should look something like this:
Now you are ready to use Beagle!
Upload reference sequence data to beagle
First check your working directory:
pwd
This should tell you where you are located within Beagle. When you first connect to Beagle, you should be within your own home directory.
In my case, I am located at:
/home/nak177
Your working directory will be different from mine and will most likely be within your own directory.
Before we run breseq, we must first download our reference sequence. For this example, I will be using the publicly available Pseudomonas aeruginosa PA14 from the Pseudomonas Genome Database.
Download the gene annotation files by scrolling down to “Download Gene Annotations” and clicking on “GBK” (this means the file is in GenBank format).
After you have downloaded this files, lets move the files onto your home directory in the Beagle server.
Open a new terminal window so that you have a new window that is not connected to the Beagle server but to your local environment.
In my case, this means that the beginning of my line of code shows:
(base) kubotan@kubotan-M1 ~ %
instead of
[nak177@beagle ref_seq]$
This will be different for your own local environment. As long as it does not say @beagle, then you should be good.
First, lets check where your downloaded files are located. In my case, I downloaded my .gbk files in my Downloads folder so I can see all .gbk files in my Downloads folder using the ls function:
ls /Users/kubotan/Downloads/*.gbk.gz
This is useful if you’re interested in locating multiple .gbk.gz files in a particular folder.
The wildcard (*) is used to indicate that I want to list all the files within my Downloads folder with any file name as long as it ends with .gbk.gz. The .gz just indicates that the file is zipped
If you’re only interested in looking at a single file, and you already know its filepath and filename, then you can do:
ls /Users/kubotan/Downloads/Pseudomonas_aeruginosa_UCBPP-PA14_109.gbk.gz
For Mac users, the easiest way to get your file path (i.e. the direction to a particular folder) is by going to Finder and right clicking on your folder, hold down the Options key, and select “Copy Downloads as Pathname”.
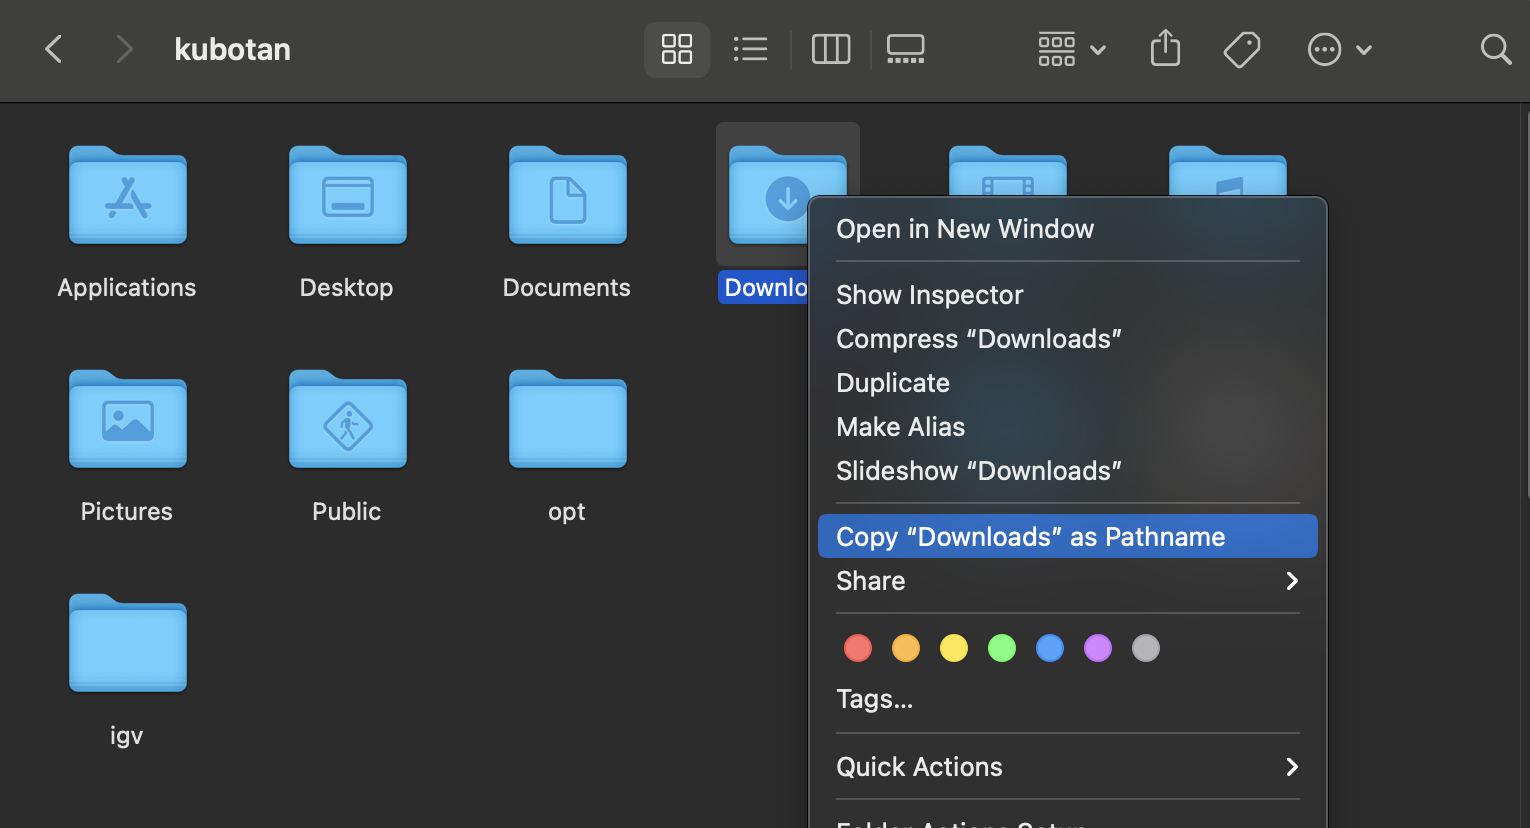
Then in your new terminal window, type in ls and paste in your file path by doing Cmd+v with “/*.gbk.gz” added at the end:
ls /Users/kubotan/Downloads/*gbk.gz
Check to make sure that the output shows your downloaded files only like so:
/Users/kubotan/Downloads/Pseudomonas_aeruginosa_UCBPP-PA14_109.gbk.gz
Now we will upload these files from your computer to your home directory. To do so, use the scp function with -r, and make sure to indicate the correct file path for both your local and server directory. In my case, this will be:
scp -r /Users/kubotan/Downloads/*.gbk.gz nak177@beagle.mmg.pitt.edu://home/nak177/ref_seq
Note that I am uploading these files to MY home directory (i.e. nak177) into my folder called “ref_seq”. Make sure you change the above line of code so that it has YOUR directory file path on it. Otherwise, I will get your uploaded files into my directory.
It is good practice to keep your home directory organized. I recommend that you make a folder in your home directory where you will store your reference sequences. You can do this by doing:
mkdir ref_seq
After your files are uploaded, lets unzip them. First, make sure that you are in the directory where your files are located and then use the gzip function:
gzip -d *.gz
The wildcard (*) here indicates to unzip anything with the extension .gz in your working directory.
Check that your files are unzipped by doing:
ls
Using the same method, upload your whole genome sequence data onto beagle. For the purposes of this tutorial, we will be using my raw sequence data which you can download from my Google Drive here (R1) and here (R2). You will need both R1 and R2 files to properly align reads against the reference genome.
Trim reads
Important: some sequencing companies trim adapters for you. Make sure to check if your raw reads already have their adapters trimmed before proceeding.
Trimming the reads is important, especially if your reads still have the adapters attached to them. Use the following script to trim your reads, making sure to change the filepath to your appropriate filepath:
#!/bin/bash

#SBATCH --job-name=CapDelPA14trim
#SBATCH -w node01
#SBATCH --mail-user=nak177@pitt.edu
#SBATCH --mail-type=ALL

module purge
module load trimmomatic/trimmomatic-0.36

trimmomatic PE -phred33 -threads 4 -trimlog trim.log /home/nak177/wgs/pa14/2022-01-19/Pf5_cap_del_1_S184_R1_001.fastq.gz /home/nak177/wgs/pa14/2022-01-19/Pf5_cap_del_1_S184_R2_001.fastq.gz /home/nak177/wgs/pa14/2022-01-19/Pf5_cap_del_1_forward_paired.fq.gz /home/nak177/wgs/pa14/2022-01-19/Pf5_cap_del_1_forward_unpaired.fq.gz /home/nak177/wgs/pa14/2022-01-19/Pf5_cap_del_1_reverse_paired.fq.gz /home/nak177/wgs/pa14/2022-01-19/Pf5_cap_del_1_reverse_unpaired.fq.gz ILLUMINACLIP:/opt/trimmomatic/Trimmomatic-0.36/adapters/NexteraPE-PE.fa:2:30:10 LEADING:20 TRAILING:20 SLIDINGWINDOW:4:20 MINLEN:70

module purge
Quality control
When you get your reads back from a sequencing machine or company, you want to check the quality of your reads to make sure they are good enough to work with. This is also a good step to do after you trim your reads.
I will be using the trimmed reads from the previous section to do the quality control (QC). Use the following script to trim your reads, making sure to change the filepath to your appropriate filepath:
#!/bin/bash

#SBATCH --job-name=fqc
#SBATCH -w node01
#SBATCH --mail-user=nak177@pitt.edu
#SBATCH --mail-type=ALL

module purge
module load fastqc/fastqc-0.11.5

fastqc Pf5_cap_del_1_forward_paired.fq.gz Pf5_cap_del_1_forward_unpaired.fq.gz Pf5_cap_del_1_reverse_paired.fq.gz Pf5_cap_del_1_reverse_unpaired.fq.gz -t 4

module purge
This should give you html files with information on the quality of your reads. Download this to your local computer and open the html files onto your preferred browser (like Chrome). Your FastQC report html file should look something like this:
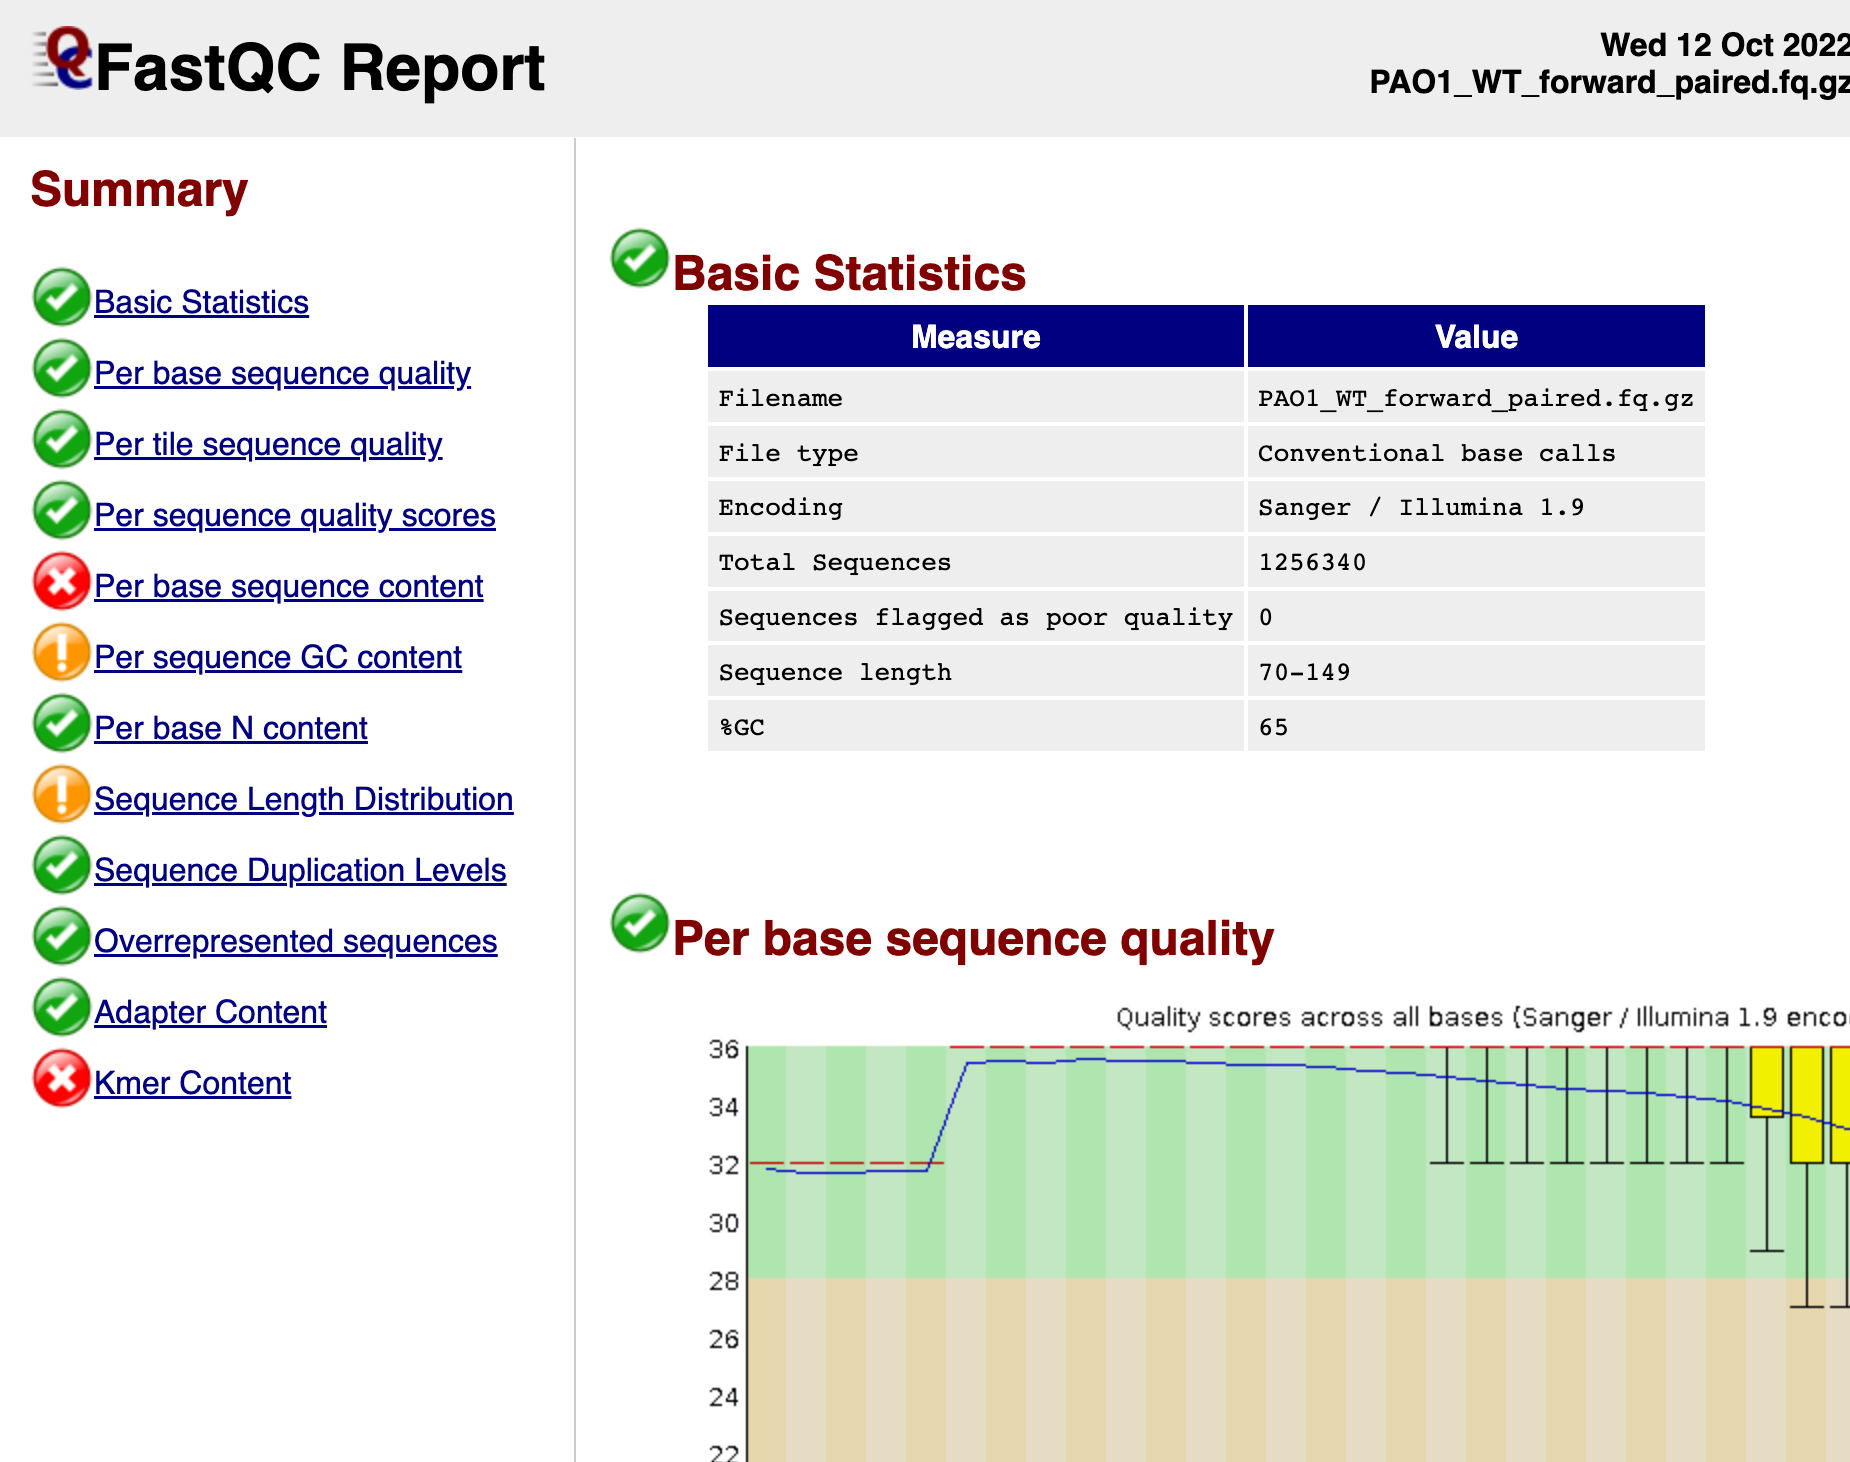
There are many resources online that teaches you how to interpret the FastQC Report, like this site. Although not all parameters need to have a green checkmark for you to run breseq, it is always a good idea to make sure and check any parameters that are flagged to see if you can proceed with aligning the reads against a reference sequence.
Run breseq
Run breseq
This is my script for running breseq in order to align my reads to the reference sequence:
#!/bin/bash

#SBATCH --job-name=breseq
#SBATCH -w node02
#SBATCH --mail-user=nak177@pitt.edu
#SBATCH --mail-type=ALL

module purge
module load breseq

breseq -r /home/nak177/ref_seq/Pseudomonas_aeruginosa_UCBPP-PA14_109.gbk /home/nak177/wgs/pa14/2022-01-19/Pf5_cap_del_1_forward_paired.fq.gz /home/nak177/wgs/pa14/2022-01-19/Pf5_cap_del_1_reverse_paired.fq.gz /home/nak177/wgs/pa14/2022-01-19/Pf5_cap_del_1_forward_unpaired.fq.gz /home/nak177/wgs/pa14/2022-01-19/Pf5_cap_del_1_reverse_unpaired.fq.gz -o /home/nak177/wgs/pa14/2022-01-19/Pf5_cap_del_1_breseq -j 2

module purge
Open a text editor and replace any file path that has “nak177” in it with your own file path.
Additionally, there are #SBATCH at the top of the bash script. These are optional but I recommend having the first one in your bash script:
- #SBATCH –job-name=your_job_name indicates what you want to name the job as once you send the bash script for computing (it is recommended that you name your job since everyone can see what jobs are running on the server)
- #SBATCH –mail-user=your_email_address indicates where you would like to receive emails on updates on your job
- #SBATCH –mail-type=ALL indicates that the server will mail you when your job starts and when it ends. This may be useful especially for jobs that can take a long time to run.
To upload your modified script from your local environment to the server, you can use scp:
scp -r /Users/kubotan/Downloads/breseq.sh nak177@beagle.mmg.pitt.edu://home/nak177/scripts
Make sure to modify the file path of the above code to suit your needs.
Once your modified script is ready and uploaded to your home directory on beagle, it is good practice to use tmux (i.e. a terminal multiplexer). Tmux is useful because it can keep your job running even if you disconnect from the server. This means that if you run a job within a tmux session, then you can log off from the server and do other tasks on your computer but your job will keep running in the server.
To make a new tmux session, do:
tmux new -s name
Where name is can be whatever you want to call your tmux session. In my case, I named mine breseq:
tmux new -s breseq
Once you have your tmux session active, you can run your script by doing:
sbatch /home/nak177/scripts/breseq.sh
You can check if your job was successfully submitted by typing:
squeue
Congrats! You have now successfully ran your first breseq run!
Once your run is over, you can view your results by looking at the “index.html” file which is located in the “output” folder of your breseq run.
Convert breseq output into csv
To be updated
Now that you have your breseq outputs, you can view the results by opening the “index.html” file in your browser. However, if you have a lot of breseq outputs (and a lot of index.html files), it is sometimes easier to convert all your outputs into one csv file so that you can view all your breseq output files as a table on Excel.
To do this, you will first need to download Chris Marshall’s breseq parser script which I have modified here.
You will also want all your breseq output folders in one master folder (for example, in a folder named “breseq_master”) like so:
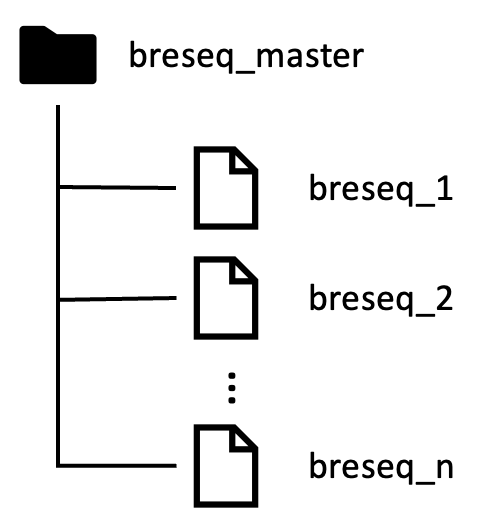
Then you can run the script on the master folder, and it should be able to locate all your breseq output files and gather all the outputs in one table.
Then you can run the script using the following commands:
module load miniconda/miniconda-3
python3 /home/nak177/scripts/breseq_parser_symbol_out.py -d /home/nak177/wgs/pa14/breseq_master/ -f csv -o /home/nak177/wgs/pa14/breseq_master/bre_out

module purge
Download the csv files (there should be three: one for SNPs, one for missing coverage, and one for new junction). You can now open it in Excel and view the table to better analyze your results.