Basics in Command Line
Last updated:
Note: This is a cheat sheet for navigating the Cooper Lab’s beagle server using command line. This is also still a working draft so please reach out if you get stuck or if anything is unclear. Non-MacOS users may have varying mileage.
Connecting to beagle
In order to access the Cooper Lab servers, you must have permission to access them. To do so, make sure to email JV to receive permission prior to getting started.
You will also need GlobalProtect installed into your computer. You can receive a free copy of it through Pitt by going to software.pitt.edu. You may need your Pitt ID to log in and download the software. Make sure to also select the appropriate version for your computer.
If you are having trouble, make sure to check here as Pitt has information on how to connect through GlobalProtect as well as a step-by-step guide for different devices.
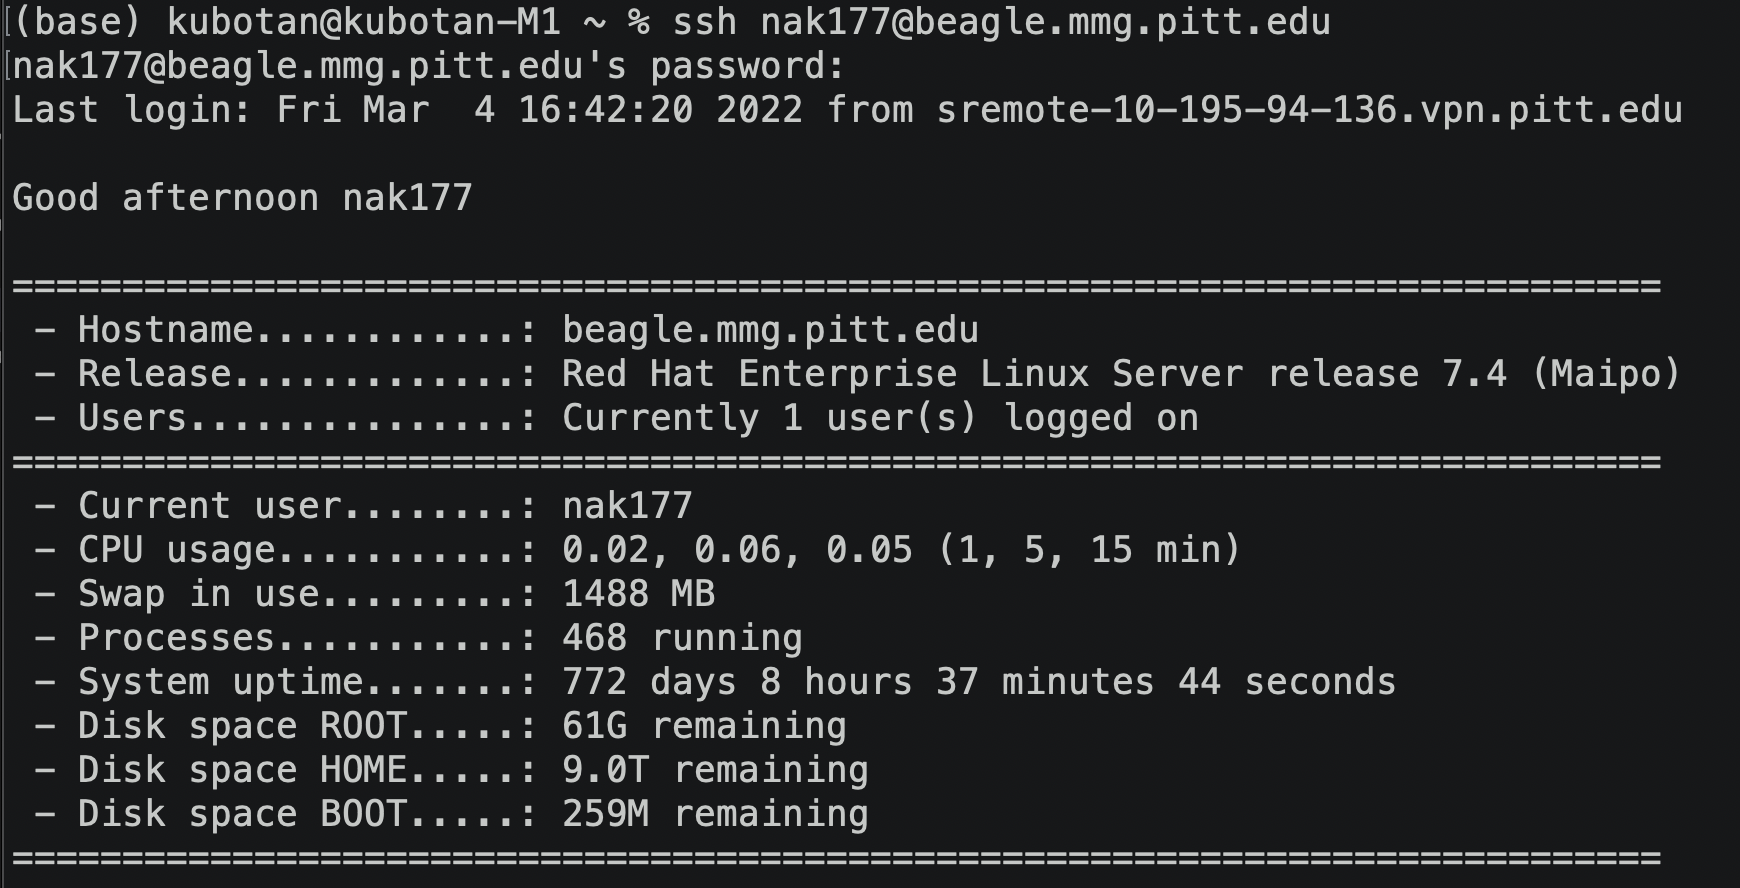
To connect to the server, use ssh followed by your own Pitt username @beagle.mmg.pitt.edu. In my case, since my Pitt ID is nak177, my line of code will be:
ssh nak177@beagle.mmg.pitt.edu
The format should be *ssh yourPittID@beagle.mmg.pitt.edu* . After you hit enter, you will be asked for your password. Type in your password and hit enter.
Your screen should look something like this:
Now you are ready to use beagle!
To exit out of beagle, just type “exit” in the console and hit enter.
Check your current working directory (pwd)
First check your working directory:
pwd
pwd stands for “print working directory” and will print the path of your working directory into the console.
This should tell you where you are located within beagle. When you first connect to beagle, you should be within your own home directory.
In my case, I am located at:
/home/nak177
List files and directories in the current working directory (ls)
To view all the files and/or directories in your working directory, you can use the ls function:
ls
If you use the above function in your home directory on beagle, it should list all the files and folders within your home directory.
If you want to look at a list of all files/directories in a specific directory, you can add the path to the directory after ls.
For example, if I want to see what is in my /scripts/ directory that is located within my home directory in beagle, I would do:
ls /home/nak177/scripts/
The above path is called an absolute path since I wrote out the full path to my scripts directory. However, you can use ls using a relative filepath too.
A relative file path points to a directory relative to your current working directory.
For example, if I am already in my home directory (/home/nak177/), then I can just do:
ls scripts
to view the files within the scripts directory since it is nested under the nak177 directory.
You can also list files in a directory above your current working directory.
For example, if my current working directory is my scripts directory (/home/nak177/scripts/) but I want to see all files and directories in my home directory (/home/nak177), then I could do:
ls ..
If I want to instead look within my ref_seq directory which located at /home/nak177/ref_seq/ folder, then I would do:
ls ../ref_seq/
This will tell the computer to go up a directory from your current working directory and list files within the ref_seq directory.
Change directory (cd)
To be updated
To go to a particular directory using the absolute path:
cd /home/nak177/scripts
To go to a particular directory using a relative path, assuming that I am currently in my home directory on beagle (/home/nak177/):
cd scripts
To go up a directory:
cd ..
To go up a directory and back down to a specific directory:
cd ../anotherDirectory/
Print file to console
If you want to see the contents of a file, you cat use the cat function (warning: this will print out the full file onto the console):
cat example.txt
If you only want to see the first ten lines of the file, you can use the head function:
head -10 example.txt
Or if you only want to see the last ten lines of the file, use the tail function:
tail -10 example.txt
Note that you can change ten to another number to modify the number of lines that gets printed into the console:
tail -5 example.txt
The above code should print out the last five lines of the file.
Uploading and Downloading to beagle (scp)
You don’t need to be in beagle to upload and download your files. All you need is to be connected to GlobalProtect.
Then you can upload files by using the scp function. In my case, if I want to upload something from my local directory onto beagle, I would do so by:
scp -r /Users/kubotan/Downloads/test.txt nak177@beagle.mmg.pitt.edu://home/nak177/
The above command will upload the “text.txt” file in my Downloads folder to my home directory (/home/nak177/) on beagle. Note: your filepath for your local directory will be different from mine, especially if you are not a MacOS user.
The general syntax for uploading from your local drive to beagle using scp is:
scp -r /filepath/of/your/file.txt yourPittID@beagle.mmg.pitt.edu://home/yourPittID/the/directory/that/you/want/to/upload/to/
To download files or a directory from beagle to your local drive, you will enter your beagle filepath then your local file path:
scp -r yourPittID@beagle.mmg.pitt.edu://home/yourPittID/filepath/to/file/to/download.txt /filepath/of/your/local/directory/
If you have the recursive parameter (-r) on, then you could also upload folders using the scp -r function.
If you have multiple files you want to upload at once, you can use a wildcard (*) to indicate this. A wildcard is used when there is variation in either your filepath or filename and you want to include all files that follow a certain pattern.
For example, if I want to upload all files with the .txt extension from my Downloads folder, then I would do:
scp -r /Users/kubotan/Downloads/\*.txt nak177@beagle.mmg.pitt.edu://home/nak177/
This will upload all files with the .txt file extension from my local directory to my home directory on beagle.
If you have directories that you want to either download or upload, then you could also use the wildcard but you might need a backslash () before your wildcard (*) for the computer to properly read your path.
For example, if I have multiple folders in my Downloads folder named breseq_1, breseq_2, …, breseq_n, etc. then I can upload all the files onto beagle by:
scp -r /Users/kubotan/Downloads/breseq_\*/ nak177@beagle.mmg.pitt.edu://home/nak177/
Keyboard shortcuts
Here are some helpful keyboard shortcuts:
- up arrow = get the previous line of code; useful if you just want to do minor edits to the previously run line of code.
- cmd + C = cancel/discard the current line
- cmd + A = jump to beginning of line
- cmd + E = jump to end of line
- esc + F = jump to beginning of next word
- esc + B = jump to beginning of current word
- cmd + W = delete a word
- cmd + U = clear up to beginning of line
- opt + space = move back by a word (in nano)
- cmd + space = move forward by a word (in nano)
- cmd + B, then D = exit out of tmux session without killing the session
Modules
modules on beagle
Show the list of available modules
module avail
Show a list of available modules that start with, for example, the letter “b”:
module avail b
Show a list of different versions of a particular module. For example for breseq, we can see different available versions by doing:
module avail breseq
Load a module (replace nameOfModule with module name, and if applicable, the version number):
module load nameOfModule
If you do module load without specifying the version number, it will load the default version number (usually the latest version). For reproducibility, I recommend writing out the version number.
Show a list of currently loaded module(s):
module list
Unload/purge modules that are loaded:
module purge
conda modules
To view conda modules, you need to load miniconda first:
module load miniconda/miniconda-3
Then you can view the list of available conda packages using:
conda list
Running scripts
tmux
tmux is useful if you want to run a script in the background and be able to work on other things while you wait for the job to finish. It allows you to disconnect from beagle with the script running without worrying about the script stopping because you exited out of beagle.
Start a tmux session prior to running a bash script by:
tmux new -s yourSessionName
Replace “yourSessionName” with any name you want.
To view a list of all your tmux sessions:
tmux ls
To attach to your most recent tmux session:
tmux a
To attach to a specific tmux session:
tmux a -t session_name
To detach from a tmux session, press cmd + B then D.
To kill all tmux sessions but your current one:
tmux kill-session -a
To kill all tmux sessions including your current one:
tmux kill-server
To kill a specific session:
tmux kill-session -t session_name
bash scripting
To write a bash script, there are many resources online that I recommend you look into to get a basic understanding of writing bash scripts.
The bare bones require you to have the following in your script header:
#!/bin/bash
This tells the computer that it is working with a bash script.
Other parameters that may be useful are:
Naming your job:
#SBATCH --job-name=jobName
Designating which node to use (either node01 or node02, or both; defaults to node01):
#SBATCH -w node02
Your email and type of email notification so beagle can send you an email once your job starts, ends, etc:
#SBATCH --mail-user=nak177@pitt.edu
#SBATCH --mail-type=ALL
sbatch, squeue, and scancel
To run your bash script, use the sbatch function:
sbatch your_script.sh
You can then view if your job is successfully running by using the squeue function.
The squeue function will also show you all the jobs that are currently running (including other people in the lab using beagle), how long the job is running for, the job name, and the job ID number.
squeue
To cancel your script, you will need to know your job ID number which can be found using the squeue function. Once you know your job ID, run:
scancel yourJobID
python scripting
To run python scripts in beagle, you must first load the miniconda module.
To use python 3 (usually, you will use python 3 and miniconda’s default is to load python 3):
module load miniconda/miniconda-3
To use python 2 (in case you require python 2 instead):
module load miniconda/miniconda-2
Then you can run a python script by:
python3 yourPythonScript.py